

Are you looking to set up an online store with osCommerce version 4.x but want to have just one active sales channel? Don't worry; we've got you covered! In this blog post, we'll walk you through the process of installing osCommerce version 4.x using the "Let me install myself" option for a single active sales channel. Let's dive in!
Before we begin, it's important to note that the trial period for osCommerce 4.x is currently unlimited. However, by the end of 2023 or at the beginning of 2024, it will be limited to 30 days. After this period, you'll have the option to sign up for osCommerce hosting at a reasonable price or migrate your website to another provider.
Selecting Single Active Sales Channel
During the installation process, you can choose to have just one active sales channel. Here's how:
Step 1: Install OsCommerce 4.x on your server using the "Let me install myself" option.
Step 2: Follow the instructions from the manual provided for multiple sales channels, which will guide you through the initial steps or watch the corresponding video https://www.youtube.com/watch?v=qkTWc63Vqoo&list=PLHN7KfrDE8gOOTgXVSeFEo4L15Y98IURB&index=6:
|
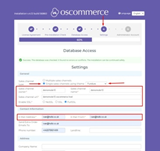
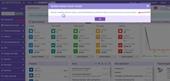
Step 3: At the fourth step (Settings), you'll find a drop-down list of sales channels. Select the desired sales channel for your single active option. For example, we'll choose "Furniture" as our sales channel. |
 |
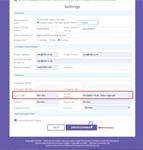 |
Step 4: Fill in the required fields and click on the "Update Database" button to proceed. |
|
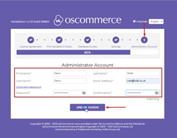
Step 5: Moving on to the fifth step (Administrator Account), fill in the necessary details and click on "Create Access" to create your administrator account. An email will be sent to your specified email address with the link to the administrator area and login credentials. |
 |
|
|
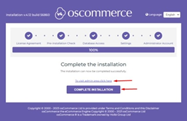
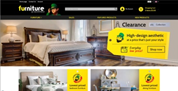
Step 6: You can click either on the "To visit admin area click here" link or on the "Complete Installation" button. If you click on the "Complete Installation" button, you can see the sales channel with the corresponding theme you have chosen - that is Furniture theme. |
Removing Installation Directory
Once you've completed the installation, it's crucial to ensure your website's security by removing the installation directory. Here's how:
|
Step 1: Log in to the admin area of your website. |
 |
 |
Step 2: Click on the "Dashboard" tab. You'll notice a warning asking you to remove the Installation directory for security reasons. |
|
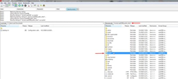
Step 3: Use your FTP client to establish a connection to the server. Navigate to the "public_html" folder and delete the "install" folder from there. |
 |
 |
Step 4: Refresh the page to confirm that the warning no longer appears. |
Confirming Sales Channel and Theme Activation
To verify that your single sales channel and theme are activated, follow these steps:
|
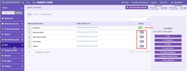
Step 1: Click on the "Sales channels" tab. Here, you should see your chosen sales channel activated, while the other sales channels remain inactive but accessible for future reference. |
 |
 |
Step 2: Now, navigate to the "Design and CMS" and "Themes" tab. Ensure that the "Furniture" theme (or your chosen theme) has been successfully installed and that other themes are available for reference. |
Start Configuring Your Website
Congratulations! You've successfully installed osCommerce version 4.x with a single active sales channel. You can now start configuring your website to showcase your products and services to the world.
Remember to explore the various features and customization options available to make your online store unique and appealing to your customers.
We hope this step-by-step guide has been helpful in setting up your osCommerce store. If you encounter any challenges or have questions, feel free to reach out to osCommerce support or the vibrant community of users for assistance. Happy selling!
Also, see the link to the playlist below demonstrating the osCommerce version 4.x installation on your own server, Install osCommerce for me and Let me install myself options:
https://www.youtube.com/watch?v=XivAKdQTni8&list=PLHN7KfrDE8gOOTgXVSeFEo4L15Y98IURB


