+44 2070601499

Assigning Theme to Sales Channels and Deleting Sales Channels

Setting up an online store involves not only creating an appealing layout but also managing various sales channels. In this guide, we will walk you through the process of assigning a theme to a sales channel and deleting unnecessary sales channels in osCommerce. These steps are crucial for customizing your store's appearance and streamlining your online sales strategies.

Assigning a Theme to Sales Channel:

  1. Accessing Admin Area: First, log in to your osCommerce admin panel. Navigate to the Sales channel tab and locate the desired channel under the Web tab.
  2. Choosing a New Theme: Click on the chosen sales channel and find the 'Choose theme' button. Here, you can explore available themes. Select the theme you prefer and click 'Assign.'


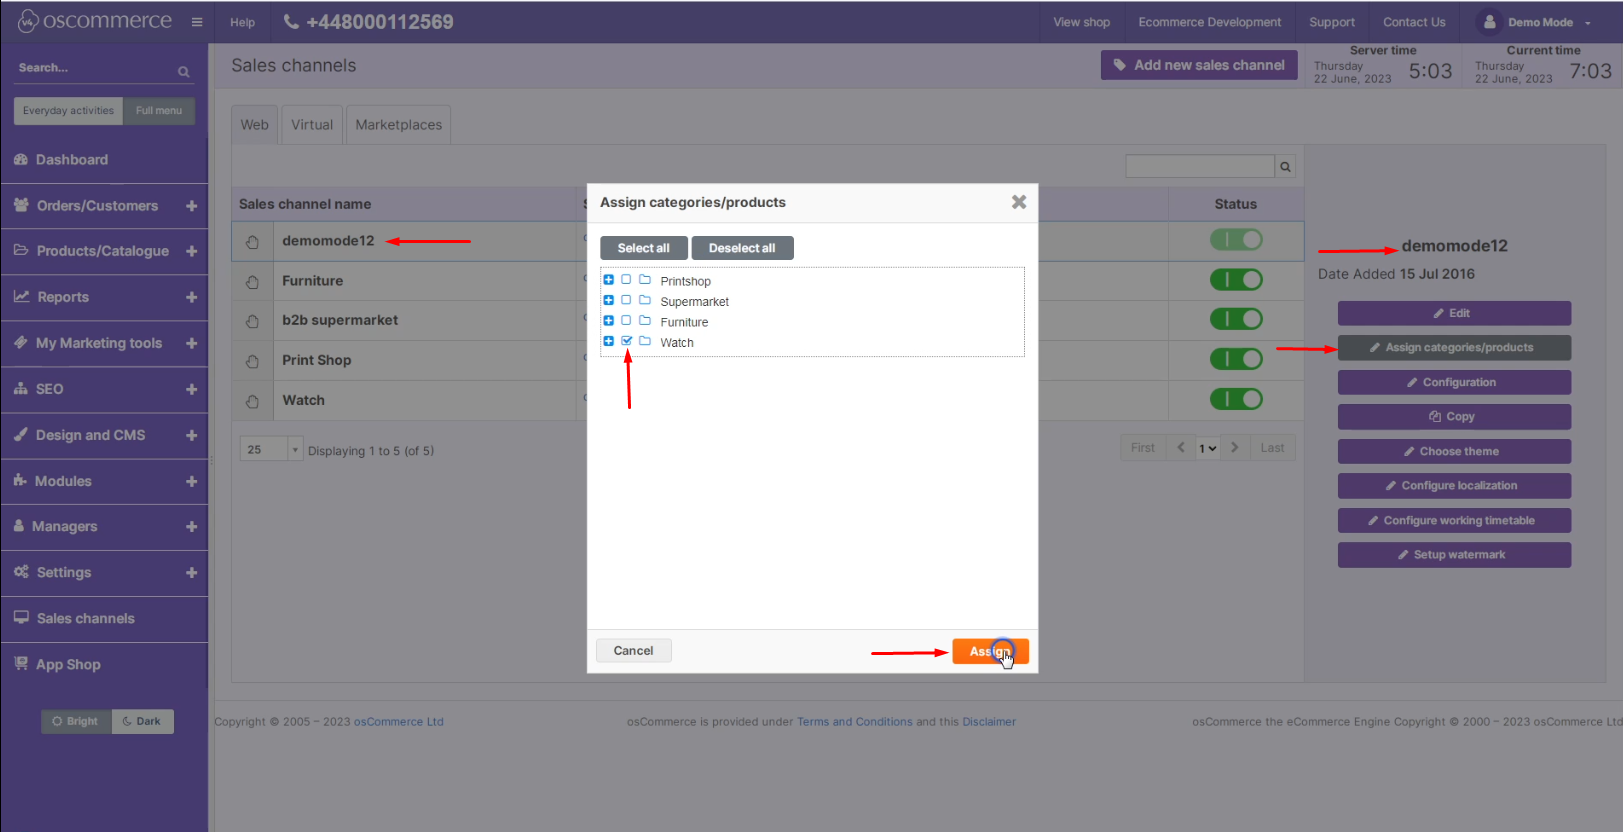
 3. Customizing Banners: After assigning the theme, tailor it to your preferences by adding necessary banners. Once configured, save your changes.

 4. Result: Your selected theme, such as 'Printshop,' is now applied to the designated sales channel, enhancing its frontend appearance.


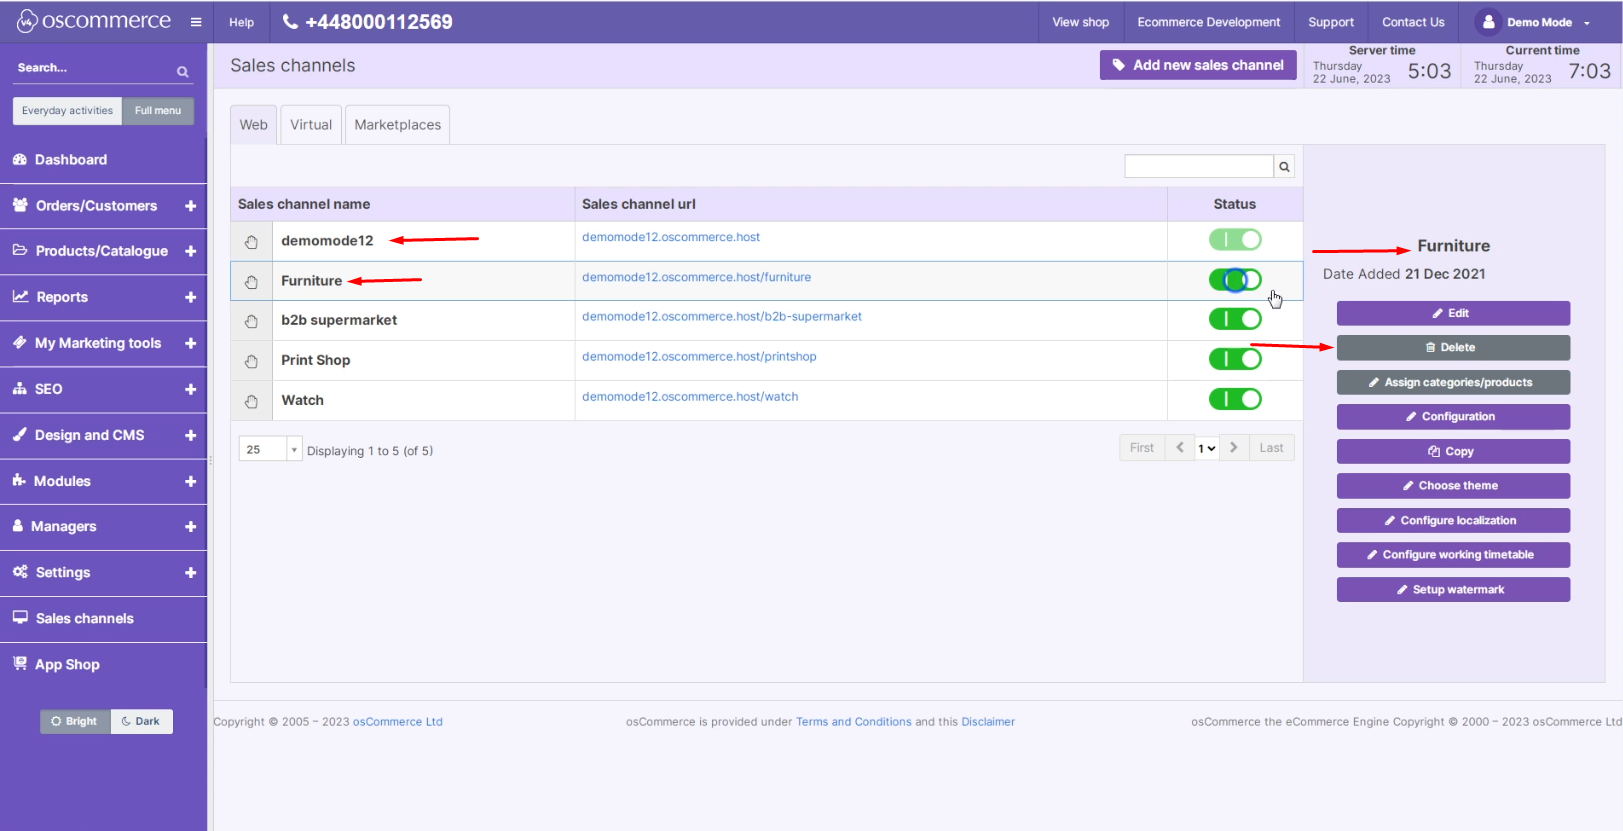
Deleting Unnecessary Sales Channels:

  1. Accessing Sales Channels: Go to the Sales channels tab, where you can view a list of all available channels. Select the one you want to remove.
  2. Deletion Process: Within the selected sales channel, locate the 'Delete' button. Click it to remove the channel. Note: Ensure you've assigned relevant categories and products to your default sales channel before deletion.


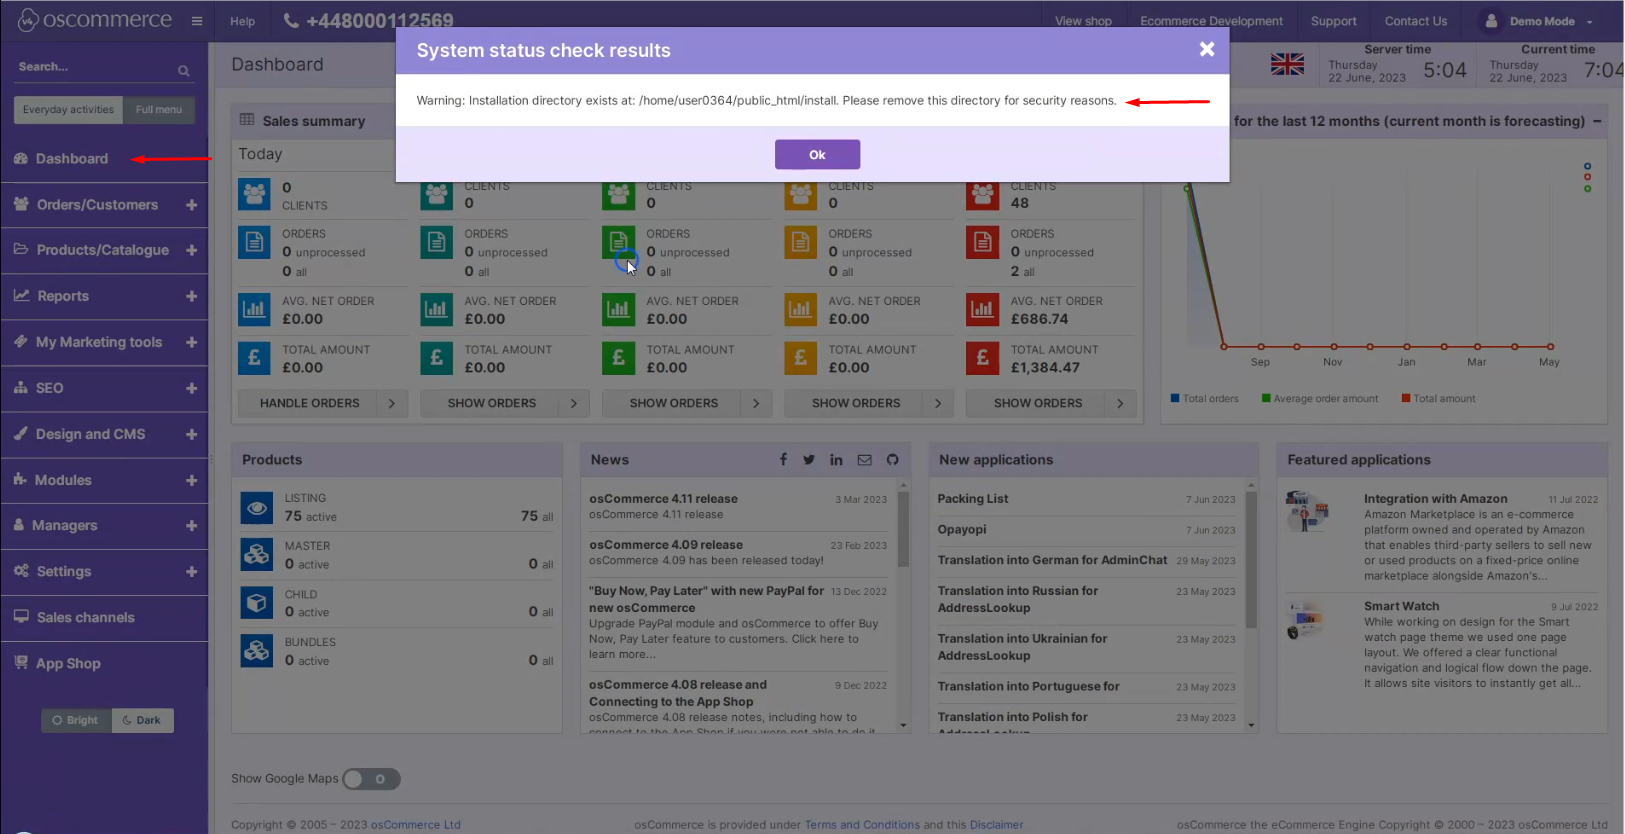
 3. Handling Installation Directory: Navigate to the Dashboard tab. You might receive a warning prompting you to remove the Installation directory for security reasons.


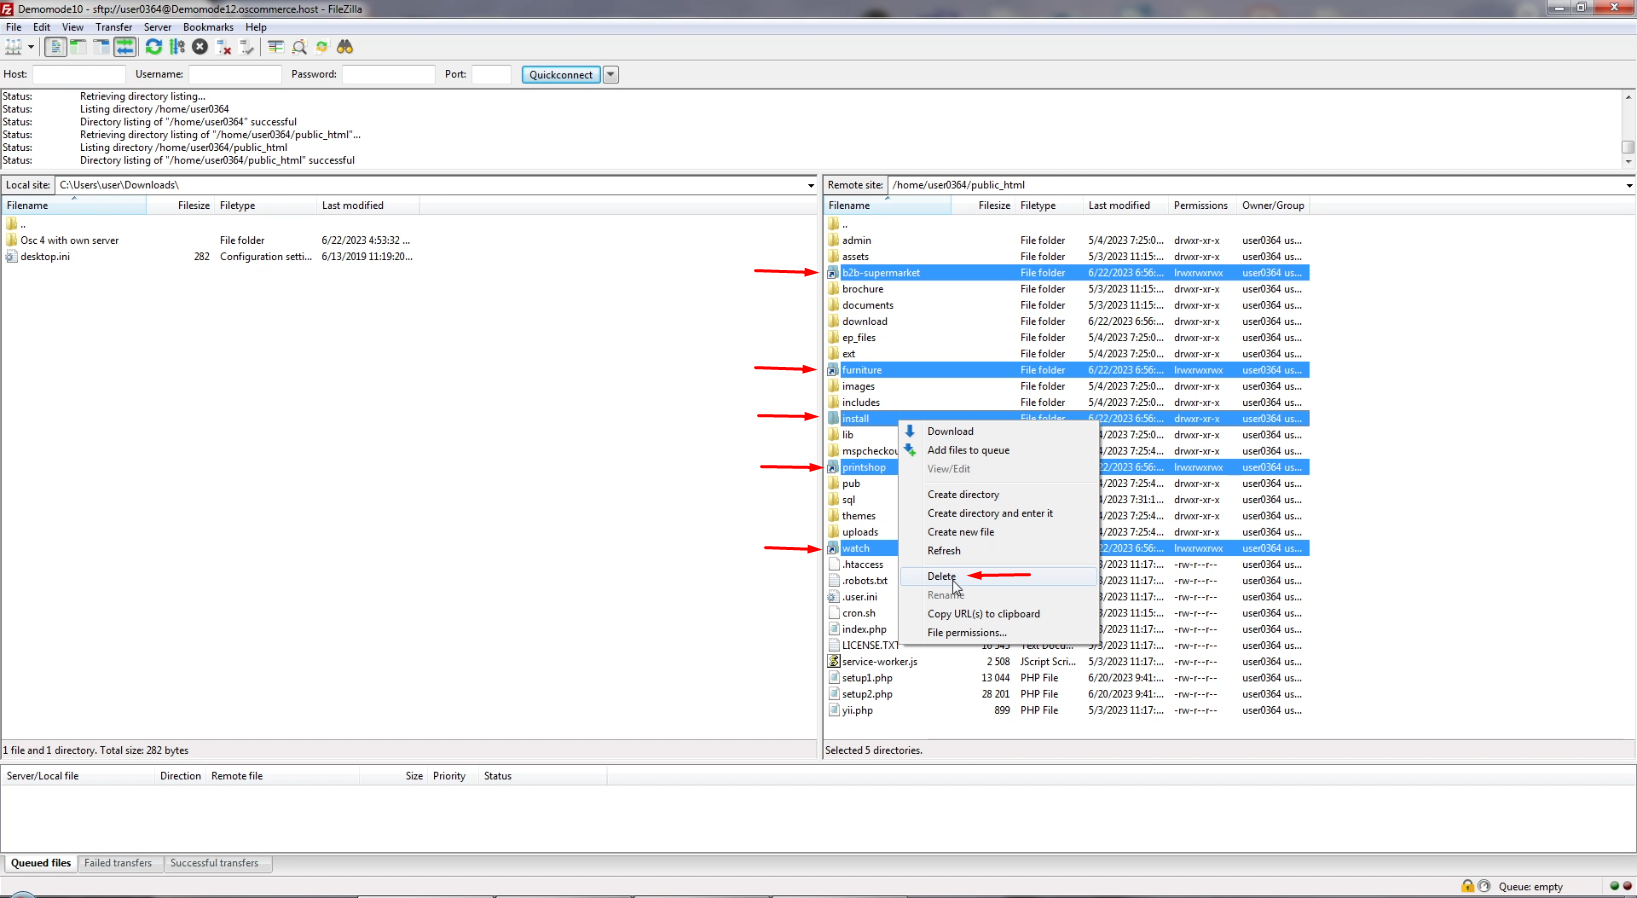
 4. FTP Access: Using your FTP client, establish a connection to your server. Remove the Installation directory and symbolic links associated with any redundant sales channels.


 5. Verification: Refresh your page to confirm that the warning no longer appears, indicating the successful removal of the Installation directory.


By following these steps, you can efficiently manage your osCommerce store's themes and sales channels, ensuring a seamless and visually appealing online shopping experience for your customers.

Recent posts
post item

Managing Counties and States

November 30, 2023
Managing Counties and States ...
post item

Managing Countries

November 29, 2023
Managing Countries ...
post item

Managing Filters

November 28, 2023
Managing Filters ...
post item

Managing Cache Control

November 27, 2023
Managing Cache Control ...
post item

Managing Cross Sell Type

November 24, 2023
Managing Cross Sell Type ...
post item

Managing Stock Delivery Terms

November 23, 2023
Managing Stock Delivery Terms ...
post item

Managing Notify Me when in Stock

November 22, 2023
Managing Notify Me when in Stock  ...
post item

Managing Stock Indication

November 21, 2023
Managing Stock Indication ...
post item

Managing Comment Templates

November 20, 2023
Managing Comment Templates ...
post item

Managing Order Statuses

November 17, 2023
Managing Order Statuses ...
Products
Tags

Management

Ecommerce

Integrations

launch

grant

fund

replatforming

osCommerce 4.x

shopping cart

hosting

Installation

New PayPal Module (Latest API 2.0)

osCommerce 2.2

osCommerce 2.3

Shopping cart customizations

Manually

PayPal Express

APM (Alternative Payment Method)

Standard Variant

Advanced Variant

Configuration

Testing

Front End

Install osCommerce for Me

Let me install myself

Multiple sales channels

Single active sales channel

Installation on your own server

Assigning theme to sales channel

Deleting sales channel

Connect

App Shop

Adding Free Module

Admin Area

Adding Paid Module

Installing Module

Opayo Pi Module

Development Mode

Email Verification Before Registration

Managing Languages

Managing phpMussel

Managing Orders

oscommerce.com account

Creating Manual Orders

Managing Customers

Managing Customer Groups

Managing Brands

Managing Categories

Managing Filters on Categories

Managing Products

Managing Stock

Assigning Products and Categories to Front Ends

Assigning and Moving Products to Categories

Managing Default Sort Order on Product Listing and Category

Managing Cross-Sell and UPSell

Managing Reviews

Managing Attributes

Managing Product Groups

Managing Properties

Managing Suppliers

Managing Warehouses

Managing Sales Statistics and Purchase Report

Managing Stocktaking Costs

Managing Deleted Orders

Managing Coupons

Managing Virtual Gift Cards

Managing Sales Price

Managing Giveaways

Managing Featured Products

Managing SEO

Managing Meta Tags

Managing XML Sitemap

Settings of E-commerce Tracking for Google Tag Manager

Setting up GA4

Managing Pages

Managing Menus

Assigning Theme to Sales Channels

Deleting Sales Channels

Managing Translations

Managing Email Templates

Managing Catalog Pages

Managing Shipping Modules

Managing Payment Modules

Managing Order Structure

Managing Socials

Managing Extensions

Managing Managers

Managing Access Levels

Managing Back End Menu

Managing Configuration

Mail Sending via SMTP

Setting up SMTP

Status Groups

Order Statuses

Comment Templates

Stock Indication

Notify Me when in Stock

Stock Delivery Terms

Cross Sell Type

Cache Control

Filters

Managing Countries

Managing Counties and States