+44 2070601499

Enabling Email Verification Before Registration

In today's digital landscape, ensuring the authenticity of user registrations is paramount. By introducing an email verification step before allowing registrations, you can enhance security and prevent fraudulent or unintended account creations. Here's how you can easily enable this feature:


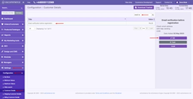
Step 1: Accessing the Admin Area

  • Begin by logging into the admin area of your website. This is the backend where you control various settings and configurations.

Step 2: Configuring Email Verification

  1. Inside the admin area, navigate to the "Settings," "Configuration," and "Customer Details" tabs. These sections house the configuration options for your website.
  2. Look for the "Email Verification Before Registration" functionality. This is the setting that you'll adjust to implement email verification.
  3. Click on the "Edit" button associated with the "Email Verification Before Registration" option.

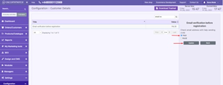
Step 3: Enabling Email Verification

  1. To enable email verification, click on the radio button labeled "True." This activates the email verification functionality.
  2. Once selected, save your changes by clicking the "Update" button.

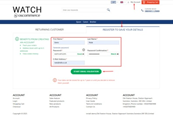
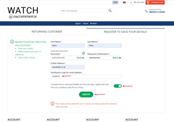
Step 4: Initiating Email Verification

  1. Move to the front end of your website. This is the user-facing part of your site where visitors interact.
  2. Click on the "My Account" tab to access user account-related options.
  3. From there, select "Register to save your details." This is where new users typically sign up.
  4. Fill out the required fields in the registration form accurately.
  5. After completing the form, locate and click the "Start email validation" button.


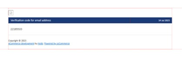
Step 5: Verifying Email Address

  1. A verification code will be sent to the email address provided during registration.
  2. Check your email inbox for the verification code.
  3. Enter the received code into the designated field on the registration page.
  4. Review and consent to any policies or terms associated with the registration process.
  5. To finalize the process, click the "Create" button.

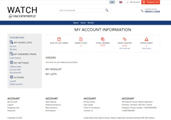
Step 6: Account Creation Complete

Congratulations! Your account creation process is now complete, fortified with an extra layer of security through email verification.


By incorporating this simple yet powerful step, you've bolstered the integrity of your user registration process. Email verification helps ensure that only legitimate users with access to the registered email address can create accounts on your platform.

Remember, security is a continuous effort. By implementing email verification, you're taking a proactive step toward safeguarding your website and its users from potential security breaches.

Recent posts
post item

Managing Counties and States

November 30, 2023
Managing Counties and States ...
post item

Managing Countries

November 29, 2023
Managing Countries ...
post item

Managing Filters

November 28, 2023
Managing Filters ...
post item

Managing Cache Control

November 27, 2023
Managing Cache Control ...
post item

Managing Cross Sell Type

November 24, 2023
Managing Cross Sell Type ...
post item

Managing Stock Delivery Terms

November 23, 2023
Managing Stock Delivery Terms ...
post item

Managing Notify Me when in Stock

November 22, 2023
Managing Notify Me when in Stock  ...
post item

Managing Stock Indication

November 21, 2023
Managing Stock Indication ...
post item

Managing Comment Templates

November 20, 2023
Managing Comment Templates ...
post item

Managing Order Statuses

November 17, 2023
Managing Order Statuses ...
Products
Tags

Management

Ecommerce

Integrations

launch

grant

fund

replatforming

osCommerce 4.x

shopping cart

hosting

Installation

New PayPal Module (Latest API 2.0)

osCommerce 2.2

osCommerce 2.3

Shopping cart customizations

Manually

PayPal Express

APM (Alternative Payment Method)

Standard Variant

Advanced Variant

Configuration

Testing

Front End

Install osCommerce for Me

Let me install myself

Multiple sales channels

Single active sales channel

Installation on your own server

Assigning theme to sales channel

Deleting sales channel

Connect

App Shop

Adding Free Module

Admin Area

Adding Paid Module

Installing Module

Opayo Pi Module

Development Mode

Email Verification Before Registration

Managing Languages

Managing phpMussel

Managing Orders

oscommerce.com account

Creating Manual Orders

Managing Customers

Managing Customer Groups

Managing Brands

Managing Categories

Managing Filters on Categories

Managing Products

Managing Stock

Assigning Products and Categories to Front Ends

Assigning and Moving Products to Categories

Managing Default Sort Order on Product Listing and Category

Managing Cross-Sell and UPSell

Managing Reviews

Managing Attributes

Managing Product Groups

Managing Properties

Managing Suppliers

Managing Warehouses

Managing Sales Statistics and Purchase Report

Managing Stocktaking Costs

Managing Deleted Orders

Managing Coupons

Managing Virtual Gift Cards

Managing Sales Price

Managing Giveaways

Managing Featured Products

Managing SEO

Managing Meta Tags

Managing XML Sitemap

Settings of E-commerce Tracking for Google Tag Manager

Setting up GA4

Managing Pages

Managing Menus

Assigning Theme to Sales Channels

Deleting Sales Channels

Managing Translations

Managing Email Templates

Managing Catalog Pages

Managing Shipping Modules

Managing Payment Modules

Managing Order Structure

Managing Socials

Managing Extensions

Managing Managers

Managing Access Levels

Managing Back End Menu

Managing Configuration

Mail Sending via SMTP

Setting up SMTP

Status Groups

Order Statuses

Comment Templates

Stock Indication

Notify Me when in Stock

Stock Delivery Terms

Cross Sell Type

Cache Control

Filters

Managing Countries

Managing Counties and States