When it comes to running a smooth online business, managing payment gateways is paramount. In this guide, we'll delve into the intricacies of managing the Opayo Pi module, a powerful tool that can revolutionize your website's payment processing. From customizing restrictions to fine-tuning general settings, we'll walk you through the process step by step.
Step 1: Customizing Restrictions
1.1 Tailoring the Opayo Pi Module
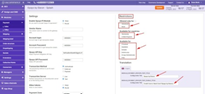
In the "Restrictions" section, you hold the reins to shape the Opayo Pi module to match your business's unique requirements. Here's how:
- Defining Customer Groups and Geographical Scope: Specify particular customer groups and countries where the Opayo Pi module should be applied. This level of customization ensures a tailored experience for different segments of your audience.
- Designating Module Application Pages: Select specific pages on your website where the Opayo Pi module should be active. This precision empowers you to control where and how the payment gateway is presented.
- Personalizing Module Name: Unify your branding across both the backend and frontend by giving the Opayo Pi module a name that resonates with your audience. Express it in the language that speaks to them the most.
|
 |
Step 2: Adjusting General Settings
1.2 Navigating the Settings Realm
The "Settings" section is where the real magic happens. This is where you'll configure the core functionalities of the Opayo Pi module. Here's your roadmap:
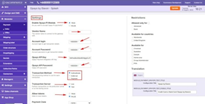 |
- Enabling or Disabling the Module: With a simple toggle, you can activate or deactivate the Opayo Pi module on your website as needed.
- Gateway Connection: Smooth communication with the gateway requires you to input your vendor login name.
- Transaction Details: Provide the necessary account login and password for seamless transaction tracking.
- API Integration: Elevate security and functionality by integrating Opayo's API key and API password.
- Transaction Processing Methods: Choose from Authenticate, Deferred, or Payment methods based on your business model.
- Server Transactions: Opt for live or test server transactions, ensuring you have the flexibility to test without affecting actual transactions.
- Token Management: Save tokens for future use by selecting the "True" option. This streamlines future transactions for your customers.
|
- Payment Zones: Define your target audience geographically, choosing from options like All World, EU, or USA.
- Order Statuses: Set specific order statuses for transactions made through Opayo Pi, enabling easy tracking and management.
- Order Saving Option: Opt to save orders before payment, a useful tactic for maintaining order IDs in transaction details.
- 3D Secure Verification: For token payments under a certain amount, you can skip the 3D secure verification process.
- Payment Priority: Set payment priority values to prioritize Opayo Pi over other payment methods. Lower values grant Opayo Pi higher precedence.
|
 |
Congratulations! By meticulously configuring the Opayo Pi module, you've unlocked a new level of payment capabilities for your website. These tailored settings ensure seamless transactions, enhanced security, and a user experience that aligns perfectly with your business goals. As you manage your Opayo Pi module with finesse, you're on track to deliver a streamlined payment experience that leaves both you and your customers delighted.
Also see the link to the playlist below demonstrating how to install Opayo Pi module from admin area and from oscommerce.com account as well as how to configure Opayo Pi module and test it on the front end:
https://www.youtube.com/watch?v=0f-lyy7iMmc&list=PLHN7KfrDE8gPPQ_PTGC9YM36dHuYApHWz


