+44 2070601499

Connecting to App Shop

Connecting to the App Shop can be a game-changer for your website, providing numerous benefits that enhance your online business. By gaining access to system updates and a wide range of applications, you can optimize your site's performance and cater to your customers' specific needs. In this blog post, we'll explore the advantages of connecting to the App Shop and guide you through the process. Let's get started!


Advantages of Connecting to App Shop:

1. Stay Updated with System Enhancements:

Accessing the App Shop ensures that you receive regular system updates, keeping your website running smoothly. While weekly updates are initially provided, rest assured that future updates will be thoughtfully tailored, incorporating valuable feedback from clients obtained via forums and private messages.

2. Discover and Download Powerful Applications:

The App Shop offers a diverse selection of applications, including modules, extensions, and new designs, that cater to your unique business requirements. By leveraging these tools, you can create a more compelling online shopping experience for your customers, ultimately boosting sales and customer satisfaction.


How to Connect to App Shop:

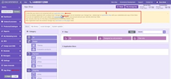
1. Access the Admin Area:

After logging in to the admin area of your website, locate and click on the "App Shop" tab.

2. Read the Instructions:

Take a moment to read the highlighted instructions in yellow, which will guide you through the connection process.

3. Register (If Necessary):

If you haven't registered yet, click on the corresponding link to visit the App Shop and create an account using your osCommerce or forum credentials.

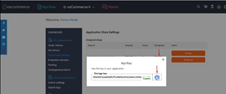
4. Add Shop Key:

Click on "Application Shop Settings" and then select "Add Shop Key."

5. Retrieve Security Store Key:

From the section highlighted in yellow, copy the 'security store key' and paste it into the "Shop Key" field. Fill in the "Shop Name" field as well, ensuring that you exclude any brackets when copying the 'security store key.'

6. Obtain Storage Key:

Click on the "Show Key" link in the Storage Key column and copy the provided key.


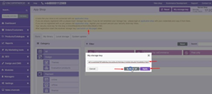
7. Implement the Connection:

Return to the admin area of your website and click on the "use button on this page” link, linking back to the App Shop. Paste the storage key in the pop-up window.

8. Apply the Connection:

Choose whether to apply this connection for all administrators by clicking "Apply for All" or only for yourself as the administrator by clicking "Apply."

After that, a confirmation message will appear, so you can start getting the required modules or extensions right now.


Congratulations! By connecting to the App Shop, you've unlocked a world of possibilities for your online store. With access to regular system updates and a vast array of applications, you can optimize your website's performance and cater to your customers' needs like never before. Start exploring the App Shop today and take your online business to new heights!

Recent posts
post item

Managing Counties and States

November 30, 2023
Managing Counties and States ...
post item

Managing Countries

November 29, 2023
Managing Countries ...
post item

Managing Filters

November 28, 2023
Managing Filters ...
post item

Managing Cache Control

November 27, 2023
Managing Cache Control ...
post item

Managing Cross Sell Type

November 24, 2023
Managing Cross Sell Type ...
post item

Managing Stock Delivery Terms

November 23, 2023
Managing Stock Delivery Terms ...
post item

Managing Notify Me when in Stock

November 22, 2023
Managing Notify Me when in Stock  ...
post item

Managing Stock Indication

November 21, 2023
Managing Stock Indication ...
post item

Managing Comment Templates

November 20, 2023
Managing Comment Templates ...
post item

Managing Order Statuses

November 17, 2023
Managing Order Statuses ...
Products
Tags

Management

Ecommerce

Integrations

launch

grant

fund

replatforming

osCommerce 4.x

shopping cart

hosting

Installation

New PayPal Module (Latest API 2.0)

osCommerce 2.2

osCommerce 2.3

Shopping cart customizations

Manually

PayPal Express

APM (Alternative Payment Method)

Standard Variant

Advanced Variant

Configuration

Testing

Front End

Install osCommerce for Me

Let me install myself

Multiple sales channels

Single active sales channel

Installation on your own server

Assigning theme to sales channel

Deleting sales channel

Connect

App Shop

Adding Free Module

Admin Area

Adding Paid Module

Installing Module

Opayo Pi Module

Development Mode

Email Verification Before Registration

Managing Languages

Managing phpMussel

Managing Orders

oscommerce.com account

Creating Manual Orders

Managing Customers

Managing Customer Groups

Managing Brands

Managing Categories

Managing Filters on Categories

Managing Products

Managing Stock

Assigning Products and Categories to Front Ends

Assigning and Moving Products to Categories

Managing Default Sort Order on Product Listing and Category

Managing Cross-Sell and UPSell

Managing Reviews

Managing Attributes

Managing Product Groups

Managing Properties

Managing Suppliers

Managing Warehouses

Managing Sales Statistics and Purchase Report

Managing Stocktaking Costs

Managing Deleted Orders

Managing Coupons

Managing Virtual Gift Cards

Managing Sales Price

Managing Giveaways

Managing Featured Products

Managing SEO

Managing Meta Tags

Managing XML Sitemap

Settings of E-commerce Tracking for Google Tag Manager

Setting up GA4

Managing Pages

Managing Menus

Assigning Theme to Sales Channels

Deleting Sales Channels

Managing Translations

Managing Email Templates

Managing Catalog Pages

Managing Shipping Modules

Managing Payment Modules

Managing Order Structure

Managing Socials

Managing Extensions

Managing Managers

Managing Access Levels

Managing Back End Menu

Managing Configuration

Mail Sending via SMTP

Setting up SMTP

Status Groups

Order Statuses

Comment Templates

Stock Indication

Notify Me when in Stock

Stock Delivery Terms

Cross Sell Type

Cache Control

Filters

Managing Countries

Managing Counties and States