

If you're looking to set up an online store with osCommerce Version 4.x, you're in the right place. In this step-by-step guide, we'll show you how to install osCommerce and configure it for multiple sales channels. But before we dive in, let's talk about some important details.
1. Introduction and Trial Period
For evaluation purposes, osCommerce currently offers an unlimited trial period. However, this trial period will be limited to 30 days starting either by the end of 2023 or at the beginning of 2024. Once the policy is implemented, you will have two options after your trial period ends: either sign up for osCommerce hosting at a reasonable price or migrate your website to another hosting provider.
2. Getting Started
To begin the installation process, follow these simple steps:
|
1. Head over to the official osCommerce website at https://www.oscommerce.com/ 2. Click on the "Try with osCommerce host" button. |
 |
 |
3. Log in to your existing osCommerce account or create a new one by clicking the corresponding options. |
|
4. Fill in the required fields and click on the "Check subdomain availability" button. |
 |
3. Starting the Installation
 |
1. Choose the "Let me install myself" option. |
| 2. Click on the "Submit request" button. | 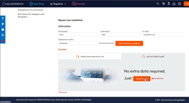 |
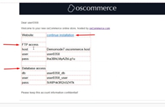 |
3. You will receive a welcome email with the link to continue the installation, along with FTP and Database access details. Click on the provided link. |
4. Installation Steps
| 1. License Agreement: At this step, click on the "Accept and Start Installation" button to proceed. | 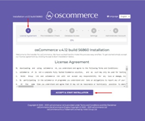 |
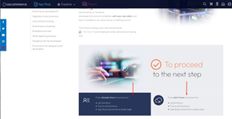
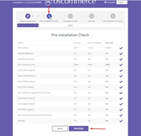 |
2. Pre-installation Check: Click on the "Proceed" button to move forward. |
| 3. Database Access: Fill in the required fields for database access and click on the "Install Database" button. | 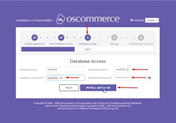 |
|
|
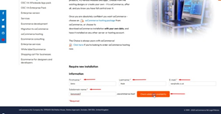
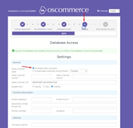
4. Settings: Complete the required fields and click on the "Update Database" button. Here, you can also choose between multiple sales channels or a single one from the drop-down list. The multiple channels option is selected by default. |
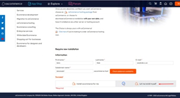
| 5. Administrator Account: Provide the necessary information and click on the "Create Access" button. You will receive an email with login details to the administrator area. | 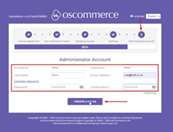 |
5. Completing the Installation
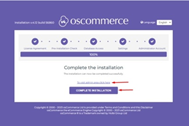 |
1. Click either on the “To visit admin area click here” link or on the “Complete Installation” button. |
| 2. If you click on the “Complete Installation” button you'll find the osCommerce Splash page with essential information. |  |
 |
3. Access the administrator area by clicking on the "Admin" option and logging in with the provided credentials. |
6. Post-Installation Steps
|
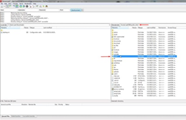
1. Remove Installation Directory: Upon accessing the admin area, you'll see a warning to remove the Installation directory for security reasons. Connect to your server using your preferred FTP client and navigate to the "public_html" folder. Delete the "install" folder from here. |
|
 |
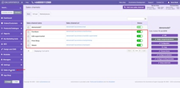
2. Refresh and Verify: Refresh the page to ensure the warning disappears. |
7. Setting up Sales Channels and Themes
|
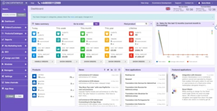
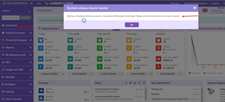
1. Click on the "Sales Channels" tab to confirm that all four sales channels have been installed. |
 |
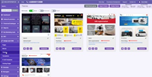 |
2. Navigate to the "Design and CMS" and "Themes" tab to check that the corresponding themes are installed as well. |
8. Configuration and Beyond
Congratulations! Your osCommerce Version 4.x installation is now complete. You can further configure your website and start building your online store.
Remember to make the most of the trial period while it's still unlimited and take your time exploring the features and functionalities of osCommerce. Once the trial period is limited, you'll have the option to sign up for the hosting service or choose another hosting provider for your online store.
With osCommerce's user-friendly interface and multiple sales channel support, you can create a powerful and customizable e-commerce platform to showcase your products and reach a broader audience. Happy selling!
Also, see the link to the playlist below demonstrating the osCommerce version 4.x installation on your own server, Install osCommerce for me and Let me install myself options:
https://www.youtube.com/watch?v=XivAKdQTni8&list=PLHN7KfrDE8gOOTgXVSeFEo4L15Y98IURB


